Hello again. As I promised earlier , I need to show you how to use the new chat-widget api (currently in alpha stage).
Remember that this is an alpha version and while we like to think is stable in many ways, we might change some parts until the final stable version is out.
Also this post is more about a sneak peek of this api (the documentation site is not done yet), but we’re working hard and it will probably be online in the next 2-3 weeks.
That being said I would like to start presenting you an example, based on a situation that is very common to many people who’ve embedded the chat-widget: how to change the visitor default name with a custom one.
You may already noticed that when a visitor is on your site a default name is assigned to him in this format: visitor3743 . Now for many this is OK, but what if one of your visitors is logged in to your site? You might want to pass his/her registered name instead of the default visitor3743, right?
This is where the API comes along.
Small API introduction
Before we start using some code let me say a few words about this api. First it’s javascript based and second in order to start coding you’ll need a widget key. Every chat-widget has its key, so for example if you have 3 different chat-widgets with different look and different configuration, you’ll also have 3 different widget keys.
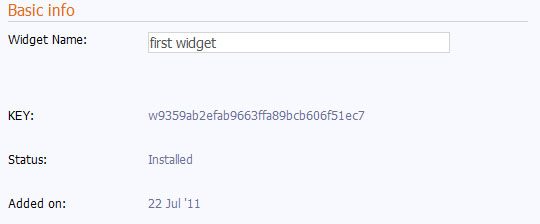
Where can I get this key you might ask. It’s very simple. Go to your account -> widgets -> select your widget -> basic info. There you’ll see the key. It will look like this: w9359ab2efab9663ffa89bcb606f51ec7 .
Now that we have the key, you need to know what to do with it. Well the key also hosts the name of the javascript variable that represents the widget. This variable is automatically created and you can implement it in you code only after you’ve embedded the code in you site or after the entire page has been loaded.
Something similar with:
window.onload=function(){
	//call some widget API
	//using the key: w9359ab2efab9663ffa89bcb606f51ec7
}
API modules
The API is divided in many modules. Once we’ll have the documentation up, you’ll have much more detailed info about this, but for now I’ll try to keep it as simple as I can. So… like I said the api is divided in many modules, but in our example we’ll use only this ones:
- Network – responsible for sending and receiving messages and other information(between operators and visitors) across the network
- Info – holds the information about the embedded widget
- Events – well this are the events that are triggered when actions are called(message received, box opened, etc…)
- Storage – handles the way information is stored locally. (by locally I mean on the browser level)
So.. If we wanna send the new visitor nick to the operator we’ll use the changeNick method.
	var newNick="John Smith";
	Network.changeNick(newNick);
Simple right? Well yes, but there’s more. You need to use the key. So, our code will change into this one:
	var newNick="John Smith";
	w9359ab2efab9663ffa89bcb606f51ec7.Network.changeNick(newNick);
Nice! But there’s more. In order to send the new nick through the network , you need to make sure the chat-widget is connected to the server and also the server has accepted the connection. To do this we’ll need to use the Events module, like this:
                w9359ab2efab9663ffa89bcb606f51ec7.Events.connect({
                    eventAction:"onConnectionStatus",
                    key:"outside",
                    when:"after",
                    group:"Network",
                    namespace:"myFirstEvent",
                    main:function(ev){
                        if(ev.error==""){
                            if(ev.object.status=="accepted"){
                                alert("Eureka! We're connected! ");
                            }
                            if(ev.object.status=="declined"){
                                alert("Server declined the connection");
                            }
                        }else{
                            // an error occurred
                        }
                    }
                });
Now let’s explain what’s going on. We use Events.connect to connect events to actions. In our example eventAction is used as an event name. For example every time the action connectionStatus is called an onConnectionStatus event is triggered. We can have more than one event triggered on the same action. To do that we need to simply use a different namespace(in our example we used namespace:”myFirstEvent”).
The when property shows the period when the event is triggered, and can have 2 values: before and after (in our case we choosed to trigger after the action was called). Every event is stored in a certain group related to the group from where the related action is. We’ll make a post later about the event groups cause there’s more to talk about.
Finally the main method is the function that is called when the events are triggered, and here you can add whatever code you want.
Now let’s combine those 2 examples from above and see what we get.
                w9359ab2efab9663ffa89bcb606f51ec7.Events.connect({
                    eventAction:"onConnectionStatus",
                    key:"outside",
                    when:"after",
                    group:"Network",
                    namespace:"myFirstEvent",
                    main:function(ev){
                        if(ev.error==""){
                            if(ev.object.status=="accepted"){
                                var newNick="John Smith";
                                w9359ab2efab9663ffa89bcb606f51ec7.Network.changeNick(newNick);
                            }
                            if(ev.object.status=="declined"){
                                alert("Server declined the connection");
                            }
                        }else{
                            // an error occurred
                        }
                    }
                });
Simple right? Yes it is, but we’re facing yet another problem: TABS. Yes tabs. Every modern browser has tabs, that means that a user can open more than one page on your site, and for every page he/she opens we change his/her name. Now that we marked the problem, let’s see the solution: Storage.
Storage module helps you save small information that can be read by other browser pages. In our case we need to store a small yes/no value that will notify the other opened windows, that we changed the name and there’s no reason to do that again. To do this we use:
var nickHasChanged=w9359ab2efab9663ffa89bcb606f51ec7.Storage.getGeneralValue("nickHasChanged");
if(nickHasChanged!="yes"){
	w9359ab2efab9663ffa89bcb606f51ec7.Storage.setGeneralValue("nickHasChanged","yes");
}
Last thing that you need to know is some basic knowledge about the Info module. Info is the module that holds the information about the every opened widget instance. So if a user opens 3 pages (3 tabs) with you site there are 3 widget instances and every instance has its own information.
First we need to set the new visitor name on every instance, like this:
w9359ab2efab9663ffa89bcb606f51ec7.Info.setNick(newNick);
Second, you need to notify the operator that you’ve changed the nick, like we showed you earlier. But like we said, what if the user opens 3 pages(3 tabs) on your site. The chat-widget will connect to the server only on one of this 3 instances. That instance will be called the master instance. To know if the current instance is a master-one or not you should use:
if(w9359ab2efab9663ffa89bcb606f51ec7.Info.master)
	w9359ab2efab9663ffa89bcb606f51ec7.Network.changeNick(newNick);
So.. that it. We’re finally over. Now let’s put the puzzle pieces together and show you the final code:
            window.onload=function(){
                var newNick="John Smith";
                w9359ab2efab9663ffa89bcb606f51ec7.Events.connect({
                    eventAction:"onConnectionStatus",
                    key:"outside",
                    when:"after",
                    group:"Network",
                    namespace:"connectionStatus",
                    main:function(ev){
                        if(ev.error==""){
                            if(ev.object.status=="accepted"){
                                var nickHasChanged=w9359ab2efab9663ffa89bcb606f51ec7.Storage.getGeneralValue("nickHasChanged");
                                if(nickHasChanged!="yes"){
                                w9359ab2efab9663ffa89bcb606f51ec7.Info.setNick(newNick);
                                    w9359ab2efab9663ffa89bcb606f51ec7.Storage.setGeneralValue("nickHasChanged","yes");
                                    if(w9359ab2efab9663ffa89bcb606f51ec7.Info.master)
                                        w9359ab2efab9663ffa89bcb606f51ec7.Network.changeNick(newNick);
                                }
                            }
                            if(ev.object.status=="declined"){
                                alert("Server declined the connection");
                            }
                        }else{
                            	//an error occurred
                        }
                    }
                });
       	     }
UPDATE (October 4, 2011)
Based on you feedback we decided yesterday to make another post about being Tired of writing the widget key
Today we decided to update the final code replacing the long widget key with a much smaller variable name. Here is the code:
            window.onload=function(){
                var newNick="John Smith";
                //the new widget variable will be myWidget
                //but you can also use w9359ab2efab9663ffa89bcb606f51ec7 as well
                var myWidget=w9359ab2efab9663ffa89bcb606f51ec7;
                myWidget.Events.connect({
                    eventAction:"onConnectionStatus",
                    key:"outside",
                    when:"after",
                    group:"Network",
                    namespace:"connectionStatus",
                    main:function(ev){
                        if(ev.error==""){
                            if(ev.object.status=="accepted"){
                                var nickHasChanged=myWidget.Storage.getGeneralValue("nickHasChanged");
                                if(nickHasChanged!="yes"){
                                myWidget.Info.setNick(newNick);
                                    myWidget.Storage.setGeneralValue("nickHasChanged","yes");
                                    if(myWidget.Info.master)
                                        myWidget.Network.changeNick(newNick);
                                }
                            }
                            if(ev.object.status=="declined"){
                                alert("Server declined the connection");
                            }
                        }else{
                            	//an error occurred
                        }
                    }
                });
       	    }
Again.. your feedback is very important to us, so feel free to try it and tell us what you think.


Pingback: Tired of writing the widget key? | HubTalk – blog
Pingback: Speed improvements on using the API | HubTalk – blog